Submitted 2002.07.09 by Dan Nicewander
The Quest for Voice or Enabling your Talking Console to Command
You're walking through the used toyshop when you spot it. From a distance you're not 100 percent sure, but if your guess is correct, it's a mint condition, fully functional, Major Matt Mason Talking Command Console! You quickly look around to ensure no one sees the sweat building up on your forehead, giving away your excitement and limiting your bargaining power.
Picking up the rectangular blue box you quickly scan the exterior noting that it appears to actually be in pretty nice shape. No broken corners. No major scratches. Handle and latch are in good shape. The window is clear. You note the price; it's ridiculously low for a sample this well preserved - clearly the person doesn't know what they have.
You open it up to examine the interior. No melt marks. Both chairs are intact. Pull ring is attached. Stickers are all there except one. Replacement stickers can be found, not too bad if that's all it needs.
You unlatch the forward console and look inside. Great! The missing sticker has simply come off and someone put it inside so it wouldn't get lost. No light bulbs, but there's no corrosion and the switch and wiring look good. It should be a simple effort to replace the bulbs.
You hold your breath, look around to make sure no one will hear, and pull the string back waiting a moment to think back on the day - have you been a good boy? Will Matt bark out the commands? Your mind races wild. Will it be a command you hear quite frequently or maybe one that you haven't heard before? Your palms are sweaty. It has to work. It just HAS to work!
You let go of the string, hoping it's as you've imagined. It has to be right? To your absolute dismay, the string snaps back into its resting place without making any sound what so ever. This can't be. It's too nice to not work! You pull it again, guessing it's just a quirk. Again, no sound at all! The Talking Command Console is MUTE!
Oh well, it's not a bad display item and someday you'll figure out how to repair it. You dicker the clerk down a few percent and walk away happy, but not elated like you were hoping. You get home, put the box on the shelf where Major Matt and Sergeant Storm sit patiently waiting for the incoming commands, but they never come. It's like a ghost ship.
The above story is true. My daughters Amy and Holly and I were on a trip to California this spring and found a really nice TCC at an antique toyshop one day. I bought it, justifying the purchase because 1) I didn't have one 2) I knew I could find out how to repair it and 3) It was just too good of deal to pass up.
How many of us have bought that "mute" Major Matt toy with the hope of someday being able to free the voices of old so that they once again would bark out the commands from our youth? How many simply pass on them, knowing you'll never have the time or ability to make them function?
In searching for background information on repairing the TCC I found that there was a lot of advice and hints (thanks goes to John Eaton, Joe "the moon suit arm guy", Dan McGinnis, and Bill Ystrom), but no published step-by-step instructions with pictures on how to go about the job. To me this would have been a great help.
As the 4th of July holiday came around this summer, I knew that I could spend no better time celebrating our Nation's freedom than by helping our best astronauts get the commands they need to fulfill their mission. Along the way I figured I'd take notes and pictures to help others who were thinking of taking this bold step as well. I'm sure that there are more correct terms to use for some of the parts, but I wanted the average person to understand what I was talking about. I hope they help!
 |
| Crushing the Rivet from the inside |
 |
| Removing the Rivet from the outside |
 |
| Repeat 3 more times |
STEP 1: The first step is to actually get at the speaker box itself. To do this you have to remove the two side rivets that hold down the inside plastic housing to the outside box. This is the plastic that the chairs are attached to. Don't worry about the rivets near the handle; you won't have to remove them. There are many options to remove the rivets. For me, I found that if I took a wire cutter and crushed the inside of the rivets, working them back and forth until I had them squeezed down enough to slip out the hole, that worked best. I then took pliers and just pulled the rivet out through the side of the TCC. Repeat for the other side.
 |
| Removing the plastic housing |
 |
| Lifting up the cardboard insert |
STEP 3: Reaching inside, remove the cardboard holder from around the speaker box.
 |
| The Voice Box |
STEP 4: Pull out the speaker box, extending enough string to allow the plastic housing (the part that you just took the rivets off from) to slip back into place.
 |
| Scoring the Seam |
STEP 5: Using an X-acto knife, score the joint all the way around the speaker box. Go very slow. Don't worry about the depth of the cut on the first pass, as it's more important for the cut to be right along the seam. After you have completed one pass, go back over the joint again putting more pressure on the cut. I suggest that this be done 3 times.
 |
| Wood Chisel Technique |
 |
| Twist and score all the way around |
 |
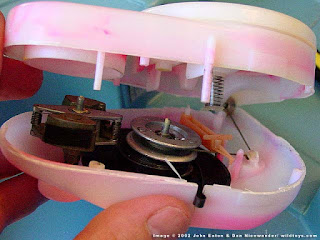
| Opening the box |
 |
| Be careful! |
 |
| Adjust the cone (if needed) |
STEP 10: Remove the needle arm and set it aside.
STEP 11: The most common issue with these speaker boxes is that over time the drive belt disintegrates. I found that a 1 7/8" x 1/16" o-ring works just great. It would better if it was a hair larger, but this was the largest I could get at the hardware store. It was a whopping 45 cents. Route it over the platen (the wheel that the record is attached to) and around the flywheel. This takes four hands. I slipped it over the platen first, and then held that while my daughter Amy pulled it away and over the flywheel groove. See picture 13. If you do the repair this way, it doesn't require restringing or messing around with the spring. I routed the o-ring on the side of the little plastic wheel, which is there for guidance I believe. My o-ring wasn't large enough to go around it anyway, so I thought I'd take a chance - and it worked fine.STEP 12: After you replace record / flywheel assembly, put the needle arm back in place.
STEP 13: Put the speaker hole side back onto the base of the speaker box. I used black electrical tape to hold the two parts together for me to test it.
I held my breath, pulled the string, and a long lost voice barked out to the Major that a meteor storm was ahead! What a rush!!! I quickly tried it again. What?!? This time it was once again mute.
I disassembled the two sides and found that the little metal sleeve that routes the string to the string spool had now snapped off. A quick use of super glue put this back in place. After drying time I taped the speaker box back together, put the cardboard holder around it, and put it back into place inside of the plastic housing.
Again, holding my breath, I heard the famous countdown - 3 - 2 - 1 - Blast Off! The roar of the spaceship engines almost made the command console shake! Again and again, gently pulling the string, listening to the commands. I have to tell you, I haven't been this satisfied with something I've done for a long time.
I didn't address the issue of re-riveting the plastic housing back onto the box. It displays fine this way and isn't going to hurt not having something in the holes. Once I figure this part out I'll update these instructions.
I hope I have given you enough information to try this on your own. To me, just having the pictures would have been a great help; I hope they are to you. Good luck!
Dan Nicewander
dan.nicewander@seagate.com
Dan is also on Facebook and part of the MMM Facebook group.
Should anybody reading this have any similar information, additions or corrections, then we would very much appreciate hearing about them.
All Mattel images and captions are copyright Mattel and used without permission. All other content, including images and editorial, is Copyright © 1997-2023 John Eaton and/or contributors unless otherwise stated. If there are any comments or objections, please contact John Eaton.


No comments:
Post a Comment