Submitted by Pat LeBlanc on 2015.12.27
You might recognize Pat's creation from Space:1999 Season 1 Episode 23 "Dragon's Domain." The Command Module was the detachable nosecone section of the Ultra Probe vessel designed for interplanetary exploration - the whole rig would work well in 1:12 scale for Major Matt Mason if a bit large. The Command Module as a separate craft is much more manageable. Pat's extensive use of custom molds for vacuformed plastic allows him a lot of flexibility in making custom toys others only dream of producing, but of course with some engineering challenges. It also cuts much of the inconvenient weight of most custom toys of this size and scale. Some small editing by me for clarity.
Pat writes:
2015.12.27 I'll be doing a MMM level of detail of the Ultra Probe from the episode "Dragon's Domain". It captures the most distinctive part of the Eagle (the Command Module) without the complexity and size of the rest. Preliminary dimension are 12" wide by 21" long.
Here are a couple of progress shots of the Ultra Command Module. Still have some wrinkles to work out (figuratively and literally).
2015.12.29 Getting close to vacuum forming the rear bulkhead/seats for the Ultra's CM:
2015.12.30 Another progress shot showing how the guys will sit inside the CM (legs resting on the lower "window panes". The top of the CM will be glued to the bottom half. That assembly will be removable and held in place on the bulkhead with 4 sets of magnets (three shown here).
2015.12.30 Another progress shot showing how the guys will sit inside the CM (legs resting on the lower "window panes". The top of the CM will be glued to the bottom half. That assembly will be removable and held in place on the bulkhead with 4 sets of magnets (three shown here).
It took the better part of 2 days but through trial and error (a lot of error), I managed to eliminate the wrinkles and get good reproduction around the windows. Raising the master by 2" got rid of the wrinkles. Getting the windows right meant melting the Styrene more which caused it to weaken and rupture before forming was complete. Adding pieces around the base solved this. I've got all the pieces. Now I just need to trim, sand, assemble, paint, decal, etc.
2016.01.01 The beginnings of the Ultra's tapered rear end or "boat tail" where the engines are mounted:
2016.01.05 Here is the master for the Ultra's boat tail with the engine mounts (PVC pipe cut at an angle) and the master for the engine bell.
2016.01.08 As stated previously, there is an elliptical cylinder between the Command Module and the boat tail with the engines. I'm going to build a jig that will let me bend a Styrene sheet into the elliptical shape and gently heat it to relieve the bending stresses. I wanted to make sure I've got the length of the cylinder right so i mocked it up in cardboard first.
2016.01.10 The first two pictures are of the Service Module shell. The second one is after "relaxing" in the oven @ 190° for 45 minutes. The third picture is Doug and Jeff at the traffic cone factory (actually these will be trimmed to be nozzles on the thruster quads on either side of the SM).
2016.01.17 It took the better part of 2 days but through trial and error (a lot of error), I managed to eliminate the wrinkles and get good reproduction around the windows. Raising the master by 2" got rid of the wrinkles. Getting the windows right meant melting the Styrene more which caused it to weaken and rupture before forming was complete. Adding pieces around the base solved this. I've got all the pieces. Now I just need to trim, sand, assemble, paint, decal, etc.
2016.01.18 I was tired of the all-white look so I took time off to do some coloring. These are the first couple of attempts at the CM shell taped together with the window sills colored in with a black Sharpie (the final version will be painted of course).
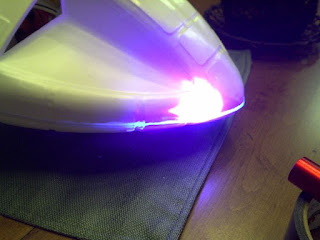
2016.01.22 I saw an ad on TV for a liquid plastic that hardens when exposed to an Ultraviolet flashlight. I thought this would be "fitting" for the Ultra probe so I bought some Rapidfix on eBay to try. It appears to work. I just need to sand down the high spots before painting. The picture doesn't really do it justice. The line where I used the compound glows a bright purple under the UV (like an old black light poster).
I used duct tape as a backing strip inside and between the two pieces and applied the compound to between and on the outside. It appears to be holding well.
2016.01.25 Ultra update: the bulkheads are installed in the Service module shell and I've started working on some of the decals.
2016.01.27 Mocking up a few more decals (just paper taped on) to see how they look.
2016.02.01 Getting close on the Ultra. This is the Service Module and the boat tail painted and with decals. I'm waiting for the weather to cooperate so i can mask and paint the window sills on the Command Module.
2016.02.03 The weather cooperated and i was able to finish painting the Command Module and apply the decals. I still need to install the windows but i figured you wouldn't be able to see Matt inside because of the glare from the flash. I added some stripes to the service module because everything looks better with stripes.
2016.05.04 I've been playing around with some LED flashers for the interior of the Ultra Command Module. There are two pair of LED's with different flash rates so there's lots of color combinations. Since the CM already has magnets, it easily hangs on the fridge and makes quite a night light:
2016.05.26 This one has more detailed "greebling" on the sides:
You can reach Pat LeBlanc on Facebook.
Should anybody reading this have any similar information, additions or corrections, then we would very much appreciate hearing about them.
All Mattel images and captions are copyright Mattel and used without permission. All other content, including images and editorial, is Copyright © 1997-2024 John Eaton and/or contributors unless otherwise stated. If there are any comments or objections, please contact Joh.


No comments:
Post a Comment