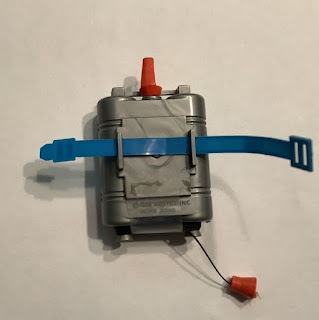
Long-time friend, fellow MMM collector and Wildtoys contributor David Benz contributes new information for the restorer. This time it's a fix for the Jet Propulsion Pak. This one is simple enough for any do-it-yourself-er!
Restringing the Jet Propulsion Pak
Restringing a jet pack is very easy. It takes about seven feet of
black string. I use the black cord you can buy for jewelry stringing at
Marshalls. 4mm I think? Not sure, but just buy whatever seems about the right
thickness to you. Old black nylon fishing line I hear looks very close to the
original string, but I can't find that anywhere... Anywhoo, DON'T use
household thread. It is too small.
The string wound round the big spindle goes out the bottom of the pack, and the
string wound round the small spindle goes out the top -- this is what creates
the leverage and makes the toy work. The big spindle actually takes more
string than the small, so you pull out around four feet to make the toy move
about three feet and, again, that's what creates the leverage and allows it to
fly upwards.
OK, so, take your seven foot (approx.) piece of thread and tie it around a bead
(you can get a small bead at Marshalls or a bead store) at the four foot
point. This bead replaces the piece of metal that was pressed onto the string
at the factory.
Now, put the bead in the middle of the two black spindle pieces (it has to be
small enough to fit in that space), thread the long side of the string through
the hole next to the big spindle, thread the small side of the string through
the hole by the small spindle, and press the two spindle pieces together. Now,
wind the long side of the string around the big spindle and put the spindle in
the bottom half of the backpack. Temporarily place the cover on the backpack
(or lightly hold down the spindle with your finger) and pull the string out to
begin winding string around the small spindle. When you've pulled the string
all the way out (the bead will stop it when you get to the end) you've now
wrapped the proper amount of string around the small spindle.
Cut the remainder of the string off the short spindle end (if the ratio is not
correct, i.e., you run out of string too soon or you have too much left over,
begin the process again and tie the bead on at a different spot to
compensate). Anywhoo, leave a little extra string to play with on each end if
you can.
Now, thread the two string ends through the metal eyes (if you've got them,
later versions of the jetpacks didn't have them), put the metal eyes in place
on the bottom half of the jetpack, and attach the red hook and plug to the ends
of the string. Personally, I adjust the plug and hook so they run into the
jetpack BEFORE the string comes to an end on either spindle. I think it's
better to have the hook and plug take up the concussion rather than the bead in
the center of the pack.
Now, put the top of the backpack on the bottom half, making sure the eyes are
centered, and put the screw back in. If you have the early version of the pack
with the bolt and nut, put the bolt in the top, the nut in the bottom, and
lightly screw it tight.
That's it, you're done. It's really a little marvel of inexpensive
technology. A flying device with no batteries!
Should anybody reading this have any similar information, additions or corrections, then we would very much appreciate hearing about them.
All Mattel images and captions are copyright Mattel and used without permission. All other content, including images and editorial, is Copyright © 1997-2023 John Eaton and/or contributors unless otherwise stated. If there are any comments or objections, please contact John Eaton.


No comments:
Post a Comment